I've always been bugged by the rounded trailing edges of the PDQ 32 keels. Every racing boat ends with a sharp 1/8 - 1/4" edge. Cars sport spoilers to reduce the negatives of a rounded rump. Additionally, the PDQ 32 CLR is too far forward, and after my genoa track up-grades, a little more area would be desirable. All of these could be helped by fairing the trailing edge out to where it belongs. About 8% more lateral plane, better positioned and with better shape.
Finished
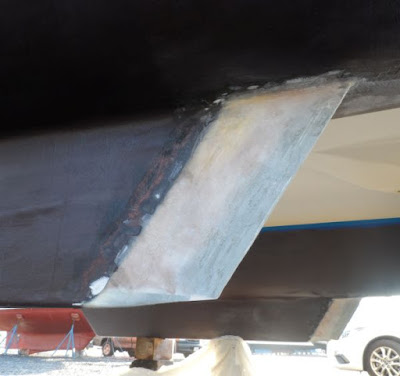
Before Paint
Though I have only sailed her one day, I haven't noticed any negatives, and though the improvements are minor, she seems to tack and go to weather just a little bit better. As the final step in an integrated 3-point improvement program (inside genoa tracks, transom extensions, keel fairing), it has come together, the result being she is much faster and easier to sail to windward.
Thanks for your excellent project report.
Your findings on the rudder angles are of particular interest as I have fitted my boat with a radial laminate mainsail that has a little extra area. The sail improved light air performance but it does increase weather helm a little when the wind picks up. It sounds like your keel addition may restore balance.
It seems I have a new item on my to do list.
Henry
I have the book, and you describe the project completely in Chapter 3, which also includes a list of parts. Thank you very much for this. I am seriously considering doing this ... well, I would have the glass guys at my boat yard do this. I've talked to them about this and it's in their wheelhouse of expertise. I'm wondering if there is any modifications or changes you might suggest (longer, any different materials, etc.)?
Actually, the main reason the post was removed from my blog is that an article on the topic was published in Practical Sailor Magazine. Often I post short versions of topics on my blog that later grow and get published. I can't leave them up both places, though it is a shame. But writing about sailing has become my living, something I would never have seen coming.
No, I would not change anything. I was quite happy with the way it turned out, a pretty simple project if done in concert with a bottom job. In a nutshell, I ground the surfaces clean, cut a 1/2-inch FRP blank, and ground the trailing edge of the blank to match the taper of the keel. I then bonded it in place with thickened epoxy, taped the joints, and faired it with more thickened epoxy, and sanded it off. Some few hours labor, but I don't remember exactly. It adds about 10 inches to the keel, as I remember, but that figure could vary slightly from boat to boat.
It really helps the boat tack cleanly, by increasing speed, improving pointing, and improving balance. In a nutshell, it is how the factory should have finished the keel and how it would have been finished on a performance model. I believe I didn't redesign anything so much more properly reproduce the designers original intention.
I think it is probably the most cost effective performance improvement for the PDQ 32, and probably for the 36 as well. The other big improvement, for the PDQ 32, is the inside genoa track. In combination, the two really make it PDQ!
thinwater wrote:No, I would not change anything. I was quite happy with the way it turned out, a pretty simple project if done in concert with a bottom job. In a nutshell, I ground the surfaces clean, cut a 1/2-inch FRP blank, and ground the trailing edge of the blank to match the taper of the keel. I then bonded it in place with thickened epoxy, taped the joints, and faired it with more thickened epoxy, and sanded it off. Some few hours labor, but I don't remember exactly. It adds about 10 inches to the keel, as I remember, but that figure could vary slightly from boat to boat.
Hi Drew, my boatyard is finishing the project. I could have done it myself after watching them, but it will whet my appetite for another glass project. It adds 9 inches to my keel.
They ground the 1/2" FRP to a 1/4" taper starting about 4 inches from the back of the FRP. The back of the existing keel was a hair less than 1" thickness. So when they put the 1/2" FRP in place, they added thickened epoxy to go from the 1" thickness to the 1/2" thickness at the front of the FRP, and eventually to the 1/4" thickness at the end of the FRP. However, this taper is not as "gradual" as the rest of the keel. It is not a "step" down but the thickness of the taper on the extension is not a perfect gradual reduction from 1" to the 1/4". My question is ... do you think this will negatively affect performance as opposed to having a perfectly reducing taper from 1" to 1/4"?
If so, I can have them add epoxy to get a perfect taper, or I'll do it myself. What do you think?
Honestly, I wouldn't worry about it. I would bet the difference is VERY minor. If it bothers you (it might bother me), just screed on some filler (epoxy thicken with a fairing filler--not fumed silica--too hard to sand) with a straight edge and sand with a long board. That is if I am understand this right (photos help a lot).
When I did mine, the extensions were measure to create a perfect, invisible taper. The curve on a different keel might have been just a little different. Something like that.
You're going to like how she points and tacks. The PDQ is a good solid design, but there are a few balance issues, and this solves one of the them.
Thanks for reposting this
I just had a run up the NSW coast from Sydney to Lake Macquarie and I feel I am having rig balance issued.
Averaged around the 6 knots most of the trip but kept fighting weather helm. Over the 7 hour trip I tried from 1 reef, 2 reefs then backwards then forwards up and down just playing around. Couldn't rely on the autopilot (the 3 to 3.5 meter messy breaking swell probably didn't help much)
So whats the first thing I should do to get the rig / hull balance right. Im thinking a larger genoa first then ???
Any guidance would be appreciated as Im the only owner of the only PDQ32 over here in Australia.
Yes, a genoa is required for proper balance. You will also need inboard tracks to get it sheeted right upwind. The keel extensions are step 2, in part because they are easy to do during a bottom job. The transom extensions help too, but not as much as the first two steps. And don't over sheet the main; the leach ribbons should always fly.
These post might help, and my book on Faster Cruising (bookstore on blog) has a lot of PDQ32-specific information.